
Here are step by step instructions for how to setup a new WordPress Website install from scratch. Including some easy extra steps to improve the security to keep the hackers and unwanted bots out.
WordPress is the framework that about 43% of all the websites on the internet are built on. WordPress is 100% Free, open source, easy to use, mobile friendly, secure, SEO friendly, and infinitely customizable. Due to its popularity, there is an incredible depth of help forums and articles (like this one) to guide your website building journey.
Some of the biggest and most influential companies and organizations use WordPress for their websites such as: TheWaltDisneyCompany.com, Rolling Stone Magazine, Vogue, WhiteHouse.gov, Sony Music, etc.
To start a new WordPress website, you need a few things:
- A server to host the files for your website. Most people buy hosting from one of the many online webhosting companies.
- You can actually host your own website on just about any computer, even a Raspberry-Pi, and get it on the internet, but that’s beyond the scope of this article.
- A domain name. This is your main brand. e.g., our domain name is techstumped.com
- Some webpages to put on your hosting server and show on the world wide web. This will be the WordPress installation in our tutorial.
You can skip ahead if you have already have hosting and a domain name:
Part 1) Getting Hosting
Website Hosting comes in many forms but for this we will keep it simple. You need your website files to be stored on a computer somewhere in the world and connected to the internet so that people can access your new website. For the majority of websites that computer is actually a Server owned by a hosting company and rented by the website owners.
Did you know, you don’t need your domain name and hosting to be bought from the same company?
If you are so inclined you could set up your own hosting computer / server at home and be in full control. That is a whole different ball game that we won’t get into right now.
Renting out a full server all for yourself can be quite expensive. Luckily most people just rent a piece of a server that is shared between multiple websites. This is called ‘Shared Hosting’ and it’s the perfect place to start. You can build a website with hundreds of pages and handle thousands of visitors a month on the right Shared Hosting plan.
If your site becomes very popular in the future and you need a more powerful server, you can upgrade your hosting with little or no effort. We did it for a site last year – the hosting company did all of the hard work, and we had our whole site moved in a couple of hours.
Website Hosting Company Recommendation
Our recommendation for a hosting company is DreamHost. We’ve been hosting websites with them for over 5 years, including TechStumped, so you know we really mean what we say.
Full disclosure, this site contains DreamHost affiliate links. This means we may earn a commission if you purchase DreamHost services through our links, without any extra cost to you. This commission helps us keep the site running. Thank you for your support!
In our years of using DreamHost we’ve used them to host many websites, and recommended them to our friends and families. We’ve used different tiers of hosting plans, and used their support team many times. The support team is available 24/7 which we have found handy on more than one occasion.
Here are some of the DreamHost hosting highlights: all the annual plans come with: a free domain name of your choice, unmetered bandwidth, fast SSD storage, the ability to handle hundreds of thousands of monthly visitors, and 24/7 support, to name a few.
For people new to website hosting, we would recommend either the “Shared Unlimited” (link) or the “DreamPress” (link) hosting plans. Both options let you make unlimited email addresses at your domain and share all the previously mentioned highlights.
The Shared Unlimited (link) plan is more flexible, because it allows you to host an unlimited number of websites, with the tradeoff that it’s a bit more work for you and maybe a bit slower when you’re getting a lot of traffic.
The DreamPress (link) plan is designed specifically for WordPress only; it only allows 1 domain name, but they will do all the setup and server-side work for you.
Signing up only takes a couple of minutes. You can pay with the usual Credit / Debit Cards or PayPal.
As mentioned, the yearly hosting plans come with a free domain name. You can get this now or hit the Choose a domain later button during checkout, if you need more time to think about the name.
2) Getting a Domain Name
You need a domain name to tell the world who your website is. This is the mywebsite.com address.
You don’t need to use a .com – this part is called a TLD (top level domain). There are a lot of TLDs like the typical .com , .net , .org , or country specific ones like .us , .ca , .co.uk , .au , or the hundreds of other options like .me , .live , .club , .realty , etc. We usually recommend sticking with the common ones or the country specific ones because those are what most people are familiar with, but it’s up to you.
A lot of hosting accounts come with a free domain name, just like the DreamHost plans we recommended above. If this is an option on your plan definitely take advantage of it.
If you need more domain names or your hosting didn’t come with a free one, we have some tips. As general advice it’s actually best to buy your domains from a different company than your hosting account.
This is because companies that specialize in selling domains can be slightly cheaper in the long run and provide better services like privacy protection. Also, if for some reason you decide you don’t like your hosting company, your domain names are safely owned through a separate company.
You can have domains transferred from one registration company to another if you need. You will need to look up the help pages from your old and new companies for this because the steps are always slightly different.
When we need to register a new domain name, and don’t have a free hosting one, we always use NameCheap.com
They have good prices, frequent sales, and provide free privacy protection. The privacy protection means if someone tries to lookup who owns your domain, they will see NameCheap’s contact info instead of your personal info.
The only thing to watch out for is to check what the ‘Retail’ price/year is, this will be the price you pay to renew your domain name each year. Some of the TLDs are more expensive than others.

Notice the Retail prices are significantly more than the first-year sale price.
Linking your Domain Name to your Hosting Company’s Servers
If you got your domain name from the same company as your hosting account then they should already be linked. You can skip to the next section.
If you get your domain name from a company that isn’t also your hosting company, there’s one simple task to link them. Just set the Nameservers in your domain name settings to point at your hosting company.
Add Hosting to a Domain on DreamHost
On DreamHost you first need to tell them you want to host a new domain on your account. On the left-hand menu go to Domains -> Manage Domains and from the top right corner hit the Add Hosting to a Domain / Sub-Domain button.

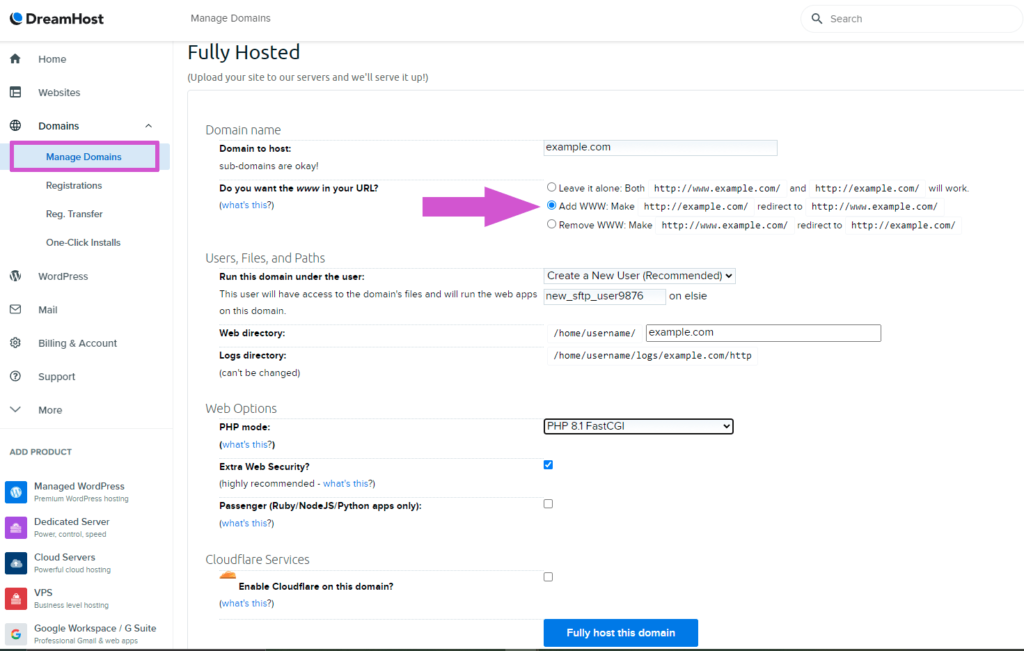
This brings up a page with a few sections but we only want the first form labeled Fully Hosted. For Domain to Host that’s going to be the domain you just registered, but only type in the basic domain name part like example.com or yournewdomain.net.
Then from the next question we recommend selecting Add WWW as the option. Having the www. at the start of your domain is slightly more secure and more useful. It is also required if you try to setup Cloudflare CDN in the future.
If you think the www is ugly or cumbersome, don’t worry no one actually needs to type it in to get to your site. Also, most modern web browsers hide this from view for users anyway.
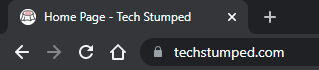
See, our full address is https://www.techstumped.com but Google Chrome hides this unless you’re trying to type in the address bar, it only shows techstumped.com for a simpler look.
Back to our form. Under Users, Files, and Paths and Run this domain under the user: it recommends to create a new user, this is your SFTP username setup. On a lot of server setups, having multiple websites set up under 1 SFTP user account can slow them all down. So, take the recommendation.
Leave the Web Directory section as is, it should have auto-filled with your domain name.
For PHP mode: we would suggest selecting the highest PHP version with FastCGI available in the dropdown. Different accounts will have different options here and the hosting company will add new ones from time to time.
DreamHost has an Extra Web Security option – keep that checked. It’s basically just firewall software you wont notice, but it helps keep your site safe.
Leave this option blank – Passenger (Ruby/NodeJS/Python apps only):
Cloudflare Services we recommend not setting this up until after your website is fully built. Otherwise, you will have to deal with the CDN cache as you make lots of changes while building the site.
Okay, hit the Fully host this domain button.
Important! – the next screen DreamHost shows you will have your new SFTP user Password at the top! Write that down somewhere.
After adding your website, go to Websites -> Manage Websites on the left-hand menu. From this page click Manage under your website, then click the DNS tab from the top and scroll down past the Records section to the Nameservers section. Here there will be a list of Nameservers to copy over to your NameCheap, or other domain registration company’s, account settings.
For example, if you buy a domain at NameCheap and want to point it at DreamHost:
In NameCheap go to the Domain List menu. Then click the Manage button beside your domain name, and then scroll down to the NAMESERVERS section. Change this dropdown from Namecheap BasicDNS to Custom DNS and some rows will show up where you can fill in Nameserver 1, Nameserver 2, etc.
Part 3) Setting up WordPress
With your Domain Name registered and your hosting account set up, you’re ready to get WordPress setup.
One-Click WordPress Install
For the fastest and easiest setup, some hosting companies like DreamHost have a 1-click install system. On DreamHost, from the left-hand menu go to Websites -> Manage Websites and under your domain hit Manage then there should be a section that says WordPress and an Install button.
Manual WordPress Install
If you prefer to be in full control, here are the steps to manually install the latest version of WordPress.
With your domain name set up at your hosting account you should have an SFTP (or FTP) username and password set up.
MySQL Database
The other thing you need is to set up a MySQL Database for your site.
On DreamHost, this is done from the left-hand menu go to Websites -> MySQL Databases
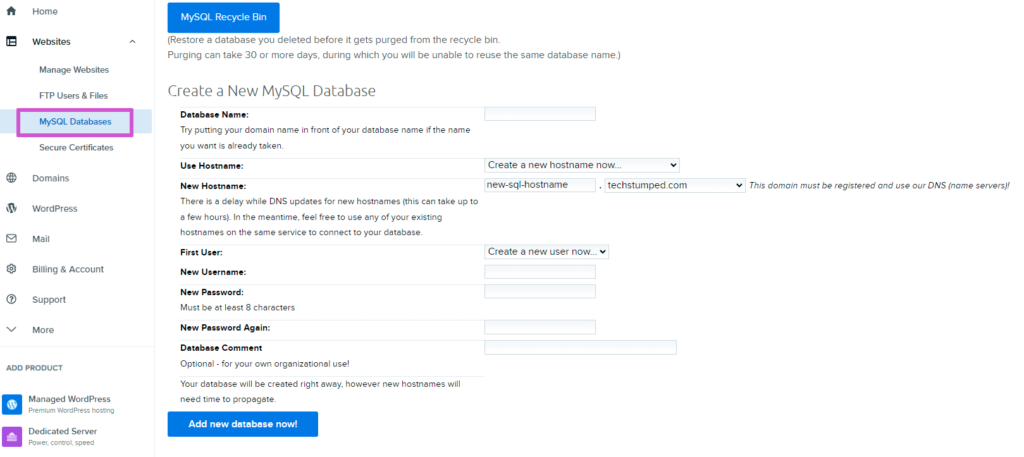
We suggest filling in most of these fields with unique names that would be hard for a hacker or bot to guess, so don’t use your name or just your domain name. You wont really need to use any of this except to copy and paste it once or twice during our WordPress setup.
The Database Name has to be lowercase only! You can also use underscores and numbers.
Make sure you pick the correct domain from the New Hostname section. Other than that, the form is straightforward.
After hitting the Add new database now! button you can return to this page at anytime and by scrolling down past the Create New Database form you will find any Databases and MySQL Hostnames you already have.
Download WordPress
Download the WordPress Install files. The most up to date WordPress install can be downloaded from the official website here: https://wordpress.org/download/#download-install
Go there and hit the Download WordPress button, save the zip file to your computer and then go and unzip it.
Setup the wp-config.php file
Open the folder and inside should be a sub-folder called wordpress, inside this locate the wp-config-sample.php file. Rename this file to just wp-config.php then open this with a simple text editor like notepad.
We’ll start by filling in these sections:
// ** Database settings - You can get this info from your web host ** //
/** The name of the database for WordPress */
define( 'DB_NAME', 'database_name_here' );

/** Database username */
define( 'DB_USER', 'username_here' );

/** Database password */
define( 'DB_PASSWORD', 'password_here' );

/** Database hostname */
define( 'DB_HOST', 'localhost' );

/** Database charset to use in creating database tables. */
define( 'DB_CHARSET', 'utf8' );

/** The database collate type. Don't change this if in doubt. */
define( 'DB_COLLATE', '' );
These are all from our MySQL Database account setup in the previous section. You should end up with something like this:
// ** Database settings - You can get this info from your web host ** //
/** The name of the database for WordPress */
define( 'DB_NAME', 'my_sites_database_123' );

/** Database username */
define( 'DB_USER', 'my_database_username123' );

/** Database password */
define( 'DB_PASSWORD', 'MySuperStrongPassword123' );

/** Database hostname */
define( 'DB_HOST', 'MySQL-Hostname.example.com' );

/** Database charset to use in creating database tables. */
define( 'DB_CHARSET', 'utf8' );

/** The database collate type. Don't change this if in doubt. */
define( 'DB_COLLATE', '' );
Make sure you don’t delete the ‘ ‘ marks around your inputs.
For DreamHost accounts you have to put in your Database hostname, but for other hosting companies you might need to leave that as localhost.
Leave the Database charset as utf8.
Leave the Database collate type blank.
Scrolling down to the next section in the wp-config file we see the section for:
 * Authentication Unique Keys and Salts.
 *
 * Change these to different unique phrases!
 * You can generate these using the {@link https://api.wordpress.org/secret-key/1.1/salt/ WordPress.org secret-key service}
 * You can change these at any point in time to invalidate all existing cookies. This will force all users to have to log in again.
Follow the instructions to get new keys and salts by going to https://api.wordpress.org/secret-key/1.1/salt/
Copy everything that shows up on that webpage. You can paste it over this section in the wp-config file:
define( 'AUTH_KEY',         'put your unique phrase here' );
define( 'SECURE_AUTH_KEY',  'put your unique phrase here' );
define( 'LOGGED_IN_KEY',    'put your unique phrase here' );
define( 'NONCE_KEY',        'put your unique phrase here' );
define( 'AUTH_SALT',        'put your unique phrase here' );
define( 'SECURE_AUTH_SALT', 'put your unique phrase here' );
define( 'LOGGED_IN_SALT',   'put your unique phrase here' );
define( 'NONCE_SALT',       'put your unique phrase here' );
The next section is: * WordPress database table prefix.
For a little added security change the wp_ section of this line of code:
$table_prefix = 'wp_';To something else like:
$table_prefix = 'mysecret_123_wp_';Choose your own, but you can only use numbers, letters, and underscores.
Leave the WordPress debugging mode section alone.
That’s it for the wp-config file, go ahead and save your changes.
Upload the WordPress files to your website
Now you need SFTP access to your hosting account. SFTP or FTP is just a way to directly access the files on your hosting server, just like accessing the files on a Dropbox or Google Drive account. The simplest way is to see if your hosting company provides online access to this.
If your hosting company doesn’t have online FTP access you will need to set up an FTP client application. We recommend FileZilla, a very popular, free, opensource program you can install and set up easily. Available here https://filezilla-project.org/download.php most hosting companies will have instructions for how to set up FileZilla with their servers and your hosting account specifically.
On DreamHost the online FTP access is under the Websites -> FTP Users & Files section on the left-hand menu. From here you can hit the Manage Files button beside your websites SFTP user account.
That will take you to a webpage with some folders listed like this (yours may be different):
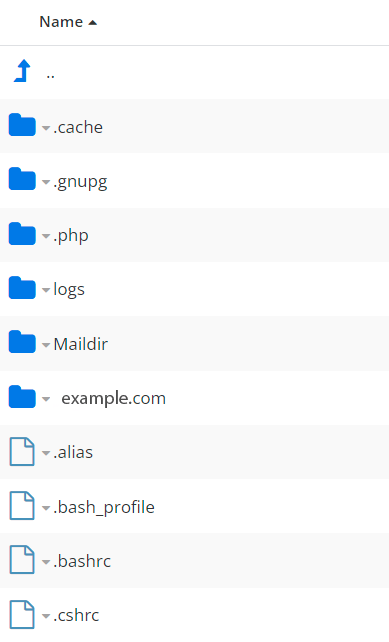
Enter the folder for your domain name. This is where we will upload the WordPress files to, if you want it installed for your whole site. If you want WordPress only installed in a sub-directory like example.com/blog then you will need to make a folder named blog and upload the WordPress files there.
You can drag and drop files into here. Or the Upload button is in the bottom left corner on DreamHost. Make sure you’re in the correct folder!

We need to upload all the files inside the wordpress folder. Don’t upload the actual wordpress folder, just the files inside it.
That should be all of these files:
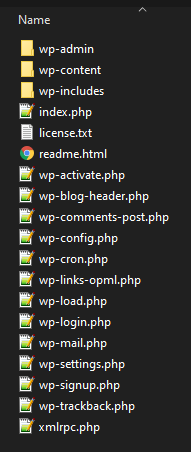
It will take a few minutes.
When the upload is complete you should be able to go to your website to finish installing WordPress.
WordPress Website Setup and Account Signup
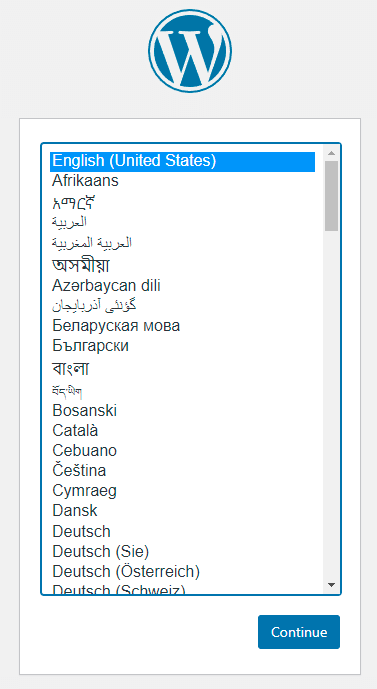
In a web browser go to your new domain name. If you installed WordPress in a subdirectory like example.com/blog you will need to go there instead.
You should be greeted by a WordPress page like this where you can select what language you want to use WordPress in.
The second WordPress setup screen will let you set up your new Username and Password, this is how you will log into your website in the future.
Make sure you set a Strong username and password!!! Do not use something like “admin” as the username, it’s the first thing hackers try.

Your Site Title is easy to change later so don’t sweat about that too much right now.
We prefer to leave Search Engine Visibility available (unchecked on this menu) because it will let search engines start to find your site even though there’s no content yet.
Hit the Install WordPress button. This can take a few seconds or a few minutes.
You should then be greeted with a Success! page showing your username and a Log in button.
The log in button should take you to the default WordPress Login Page at yourdomain.com/wp-login.php (you can also reach this screen by default at yourdomain.com/wp-admin)
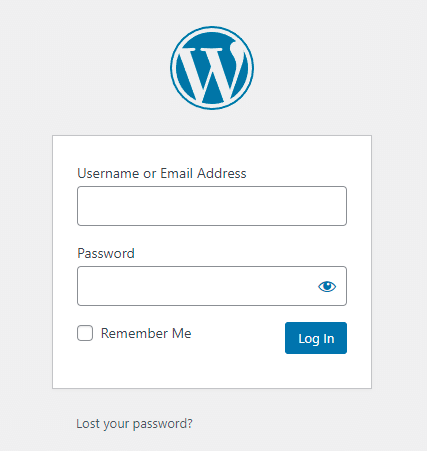
Log in to your website for the first time! Congrats!
Upgrade Your WordPress Website’s Security
We know it’s tempting to jump right into your new website and start setting up all your logos, color schemes, pages, and other content, but first you should really upgrade some of the security measures.
The last thing you want to do is spend time working on your new website and then have someone hack into it and ruin your day. Also, search engines and browsers will not send visitors to your website if some of these security upgrades aren’t done.
Head over to Chapter Two of this WordPress Website Setup Guide – How to Add Security to a WordPress Install.
Thanks for reading, please leave any questions or thoughts in the comments below.