
Add and remove wireless networks from Allowed and Blocked Filter lists.
Sometimes there’s an annoying wifi network that your laptop, or desktop keeps trying to connect to. This happens often in apartment buildings and can be very irritating. Luckily it is easy to block or hide unwanted wifi networks in Windows 10.
Windows has Allowed and Blocked filter lists for wifi network names (SSIDs) built in so all we need to do is edit them through the Command Prompt.
Step 1:
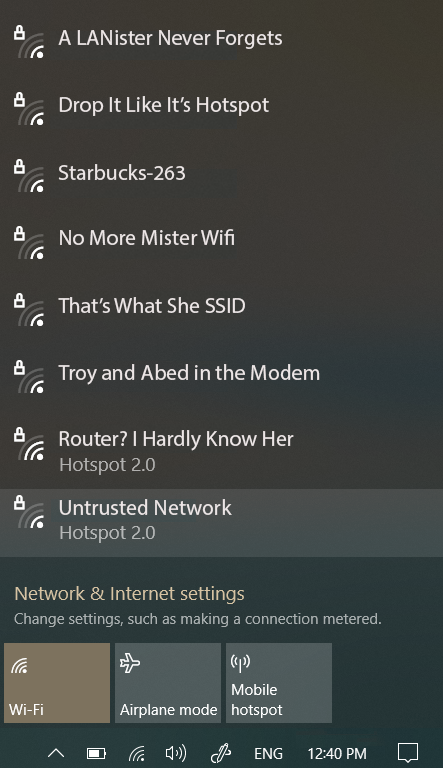
Copy the name (SSID) of of the WIFI signal you want to block. The list is available by clicking the WIFI icon in the task bar.
Step 2:
Open Command Prompt. Search in Cortana or, hit the Windows key and type “cmd” then hit enter.
Step 3:
Use the following codes to see the current Wifi Networks Filter Lists.
Remember to replace “Example-Wifi-Name” with the actual wifi network name wherever it shows up.
See Network Filter Lists
See the list of all WIFI Network Filter Lists with this command:
netsh wlan show filtersSee the list of only the Blocked wifi Networks with this command:
netsh wlan show filters permission=blockSee the list of only the Allowed wifi Networks with this command:
netsh wlan show filters permission=allowBlock and Hide Unwanted Wifi Networks
To block an unwanted Wifi signal so that it is hidden from showing up in the list of available networks, add it to the Blocked Network Filter list with this command:
netsh wlan add filter permission=block ssid="Example-Wifi-Name" networktype=infrastructureIf it didn’t work, make sure that this network isn’t already on the Allowed Wifi Networks Filter list. A network can only be on one filter list at a time.
If you blocked a network by mistake you can remove it from the Blocked Wifi Network List with this command:
netsh wlan delete filter permission=block ssid="Example-Wifi-Name" networktype=infrastructureIf you want to temporarily show the blocked wifi networks in the visual networks list, you can use this command:
netsh wlan set blockednetworks display=showTo set the blocked signals back to the default setting and hide them from the visual list use this command:
netsh wlan set blockednetworks display=hide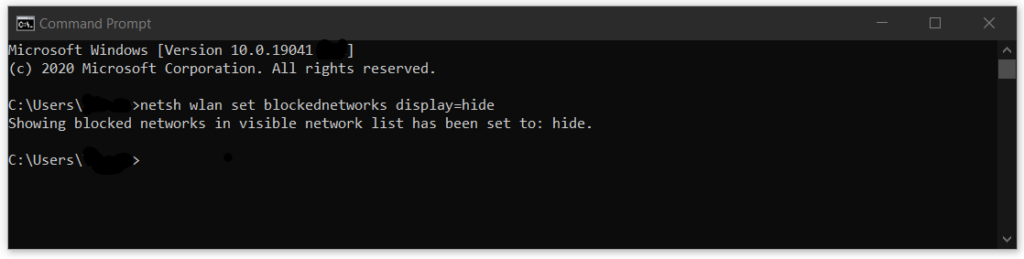
Show Only Your Home Wifi Network
If you want to hide all the networks except your own, you can do it with the Allowed Networks Filter list.
Start by adding your desired networks to the Allowed list and then automatically block any network name not on your Allowed Filter List with the DenyAll filter.
This is not recommended on a laptop that you travel with because you will have to remember to edit these filters when you need to access a new wifi network.
To add a wifi network to the Allowed Filter List use this command:
netsh wlan add filter permission=allow ssid="Example-Wifi-Name" networktype=infrastructureIf it didn’t work, make sure that this network isn’t already on the Blocked Wifi Networks Filter list. A network can only be on one filter list at a time.

If you allowed a network by mistake you can remove it from the Allowed Wifi Network List with this command:
netsh wlan delete filter permission=allow ssid="Example-Wifi-Name" networktype=infrastructureTo hide all the Wifi Networks that are not on your Allowed Networks Filter List use the following command:
netsh wlan add filter permission=denyall networktype=infrastructureTo undo that and show all the Wifi Networks except those on your Blocked Network Filter Lists use the following command:
netsh wlan delete filter permission=denyall networktype=infrastructureThat’s it.
Now you know how to Hide, or Show wifi networks using the Allowed and Blocked Network Filter lists in Windows 10.
– Tech Stumped