
How to update how MS Word default template opens. To change the settings Word opens with follow this guide. It’s a bit more work than you would expect but we’ll walk you through the steps.
Updating the startup settings for Word
To update Microsoft Word default template and view we need to modify the systems default file.
Step 1:
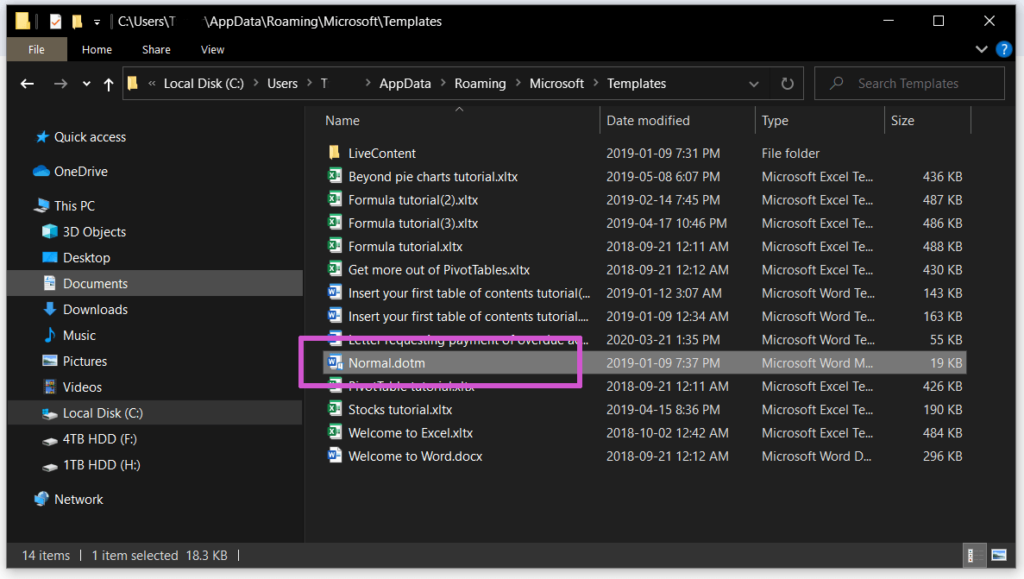
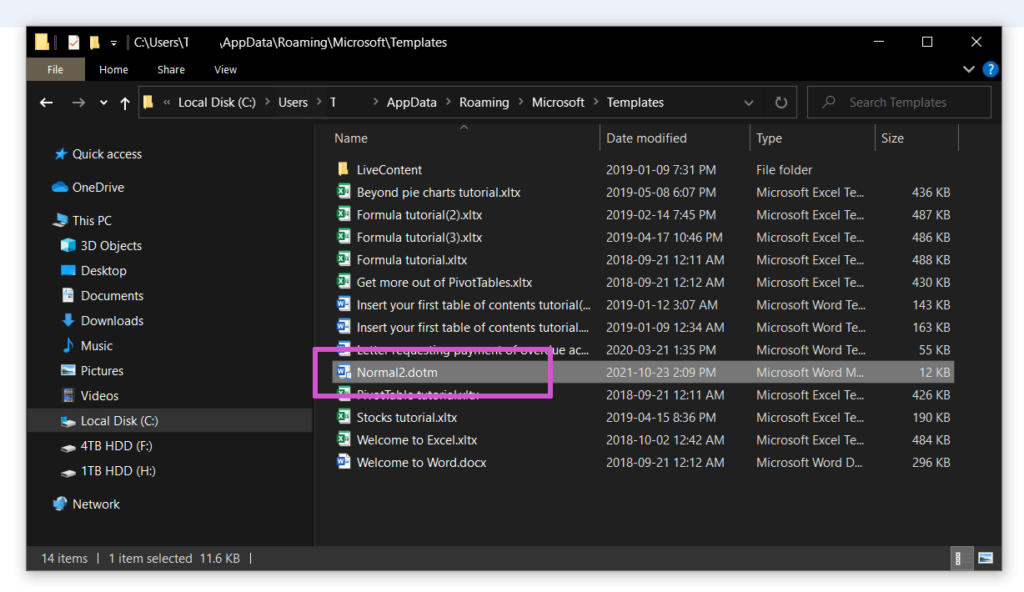
We need to find the right file to update. We will update the “Normal.dotm” file for Word. It can be found in this file location:
C:\Users\YourName\AppData\Roaming\Microsoft\Templates
The .dotm file type means “Microsoft Word Macro-Enabled Template”
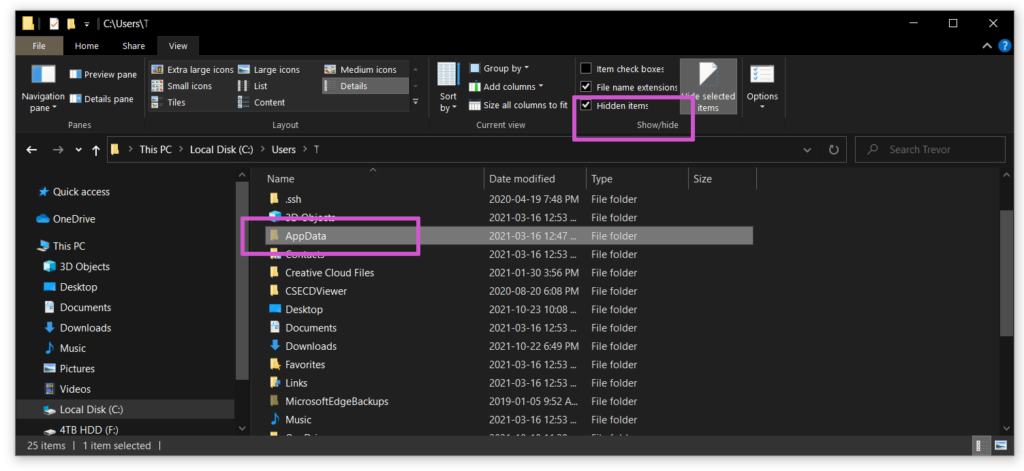
Windows Explorer Show Hidden Files
If you can’t find the ‘AppData’ folder then you need to let Explorer show Hidden Items. At the top of the window click on the ‘View’ tab and near the right side of the settings that show up at the top make sure ‘Hidden Items’ has a check mark.
Step 2: Open that Normal.dotm file with MS Word.
Step 3: Add a space and then delete it as a fake update, this will let you hit the save button if it was greyed out previously.
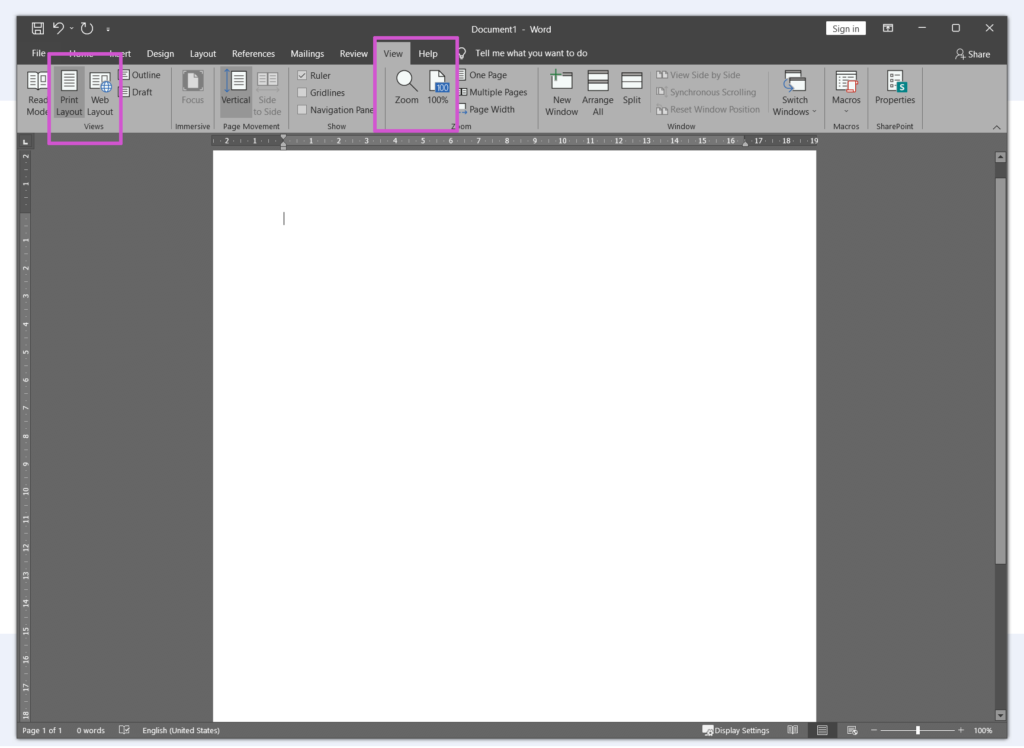
Step 4: Make what ever settings updates you want for your default Word template and view to be.
To demonstrate I’ve just changed the Styles to ‘No Spacing’

And on the View tab I’ve changed Zoom to 100% and the Views section to Print Layout.
Step 5:
Save the file. This probably won’t be as easy as you might expect. If your computer acts like ours, then when you hit ‘save’ the ‘save as’ window will show up. Obviously not what we wanted.

Click on Browse and the more standard Save As window should show up.
First change the “Save as type:” to “Microsoft Word Macro-Enabled Template (*.dotm)”
Then navigate back to the Templates folder:
C:\Users\YourName\AppData\Roaming\Microsoft\Templates
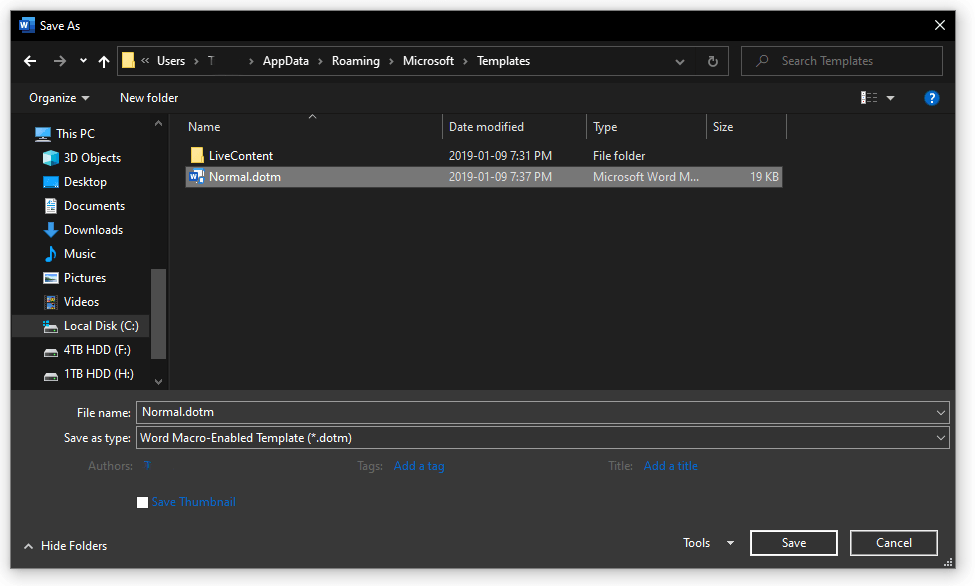
You can try to save as Normal.dotm
Maybe your system settings will allow you to do this, in which case you’re done! Our system did not let us save over the old file but instead brings up this error message:
Word cannot give a document the same name as an open document. Type a different name for the document you want to save.
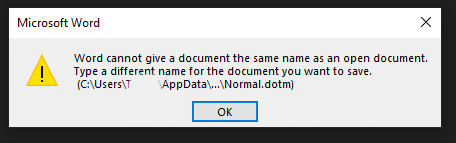
Great, thanks Word, that’s why we originally clicked Save to update the file, but instead you made us come into this save as dialog! :@ Anger.
Hit the OK button.
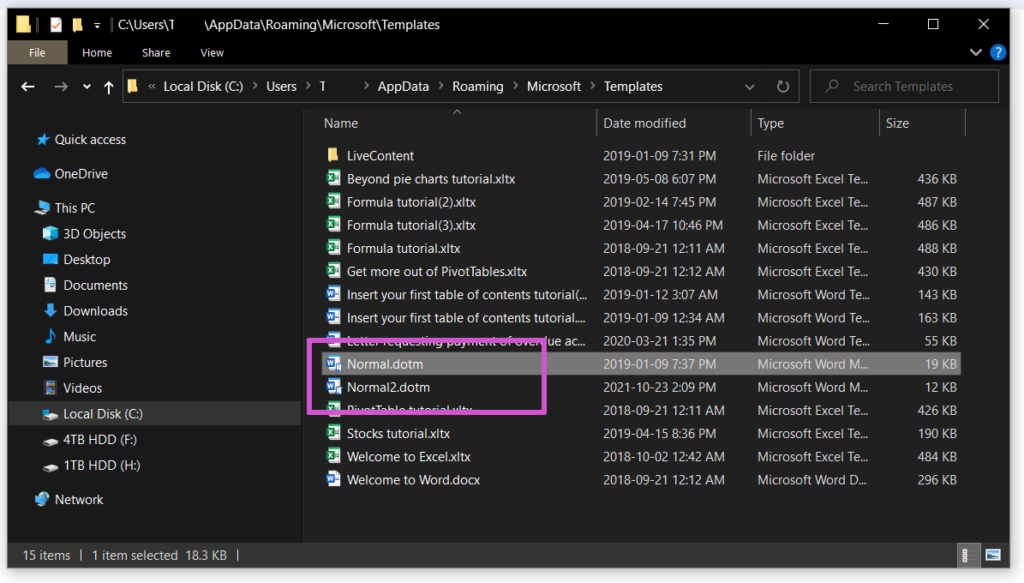
Change your File name to something like Normal2.dotm and hit save. This time it should work, but we’re not done.
We now have Normal.dotm and Normal2.dotm files in the Templates folder, but word will only look at the original file.
Step 6: Close Microsoft Word.
Step 7:
Then in Windows Explorer open up the Templates folder again:
C:\Users\YourName\AppData\Roaming\Microsoft\Templates
Backup the original Normal.dotm file just in case there’s a problem. Copy and paste a backup of this file to one of your regular file folders like my documents. It probably won’t let you Cut and paste, only Copy and paste.
Step 8:
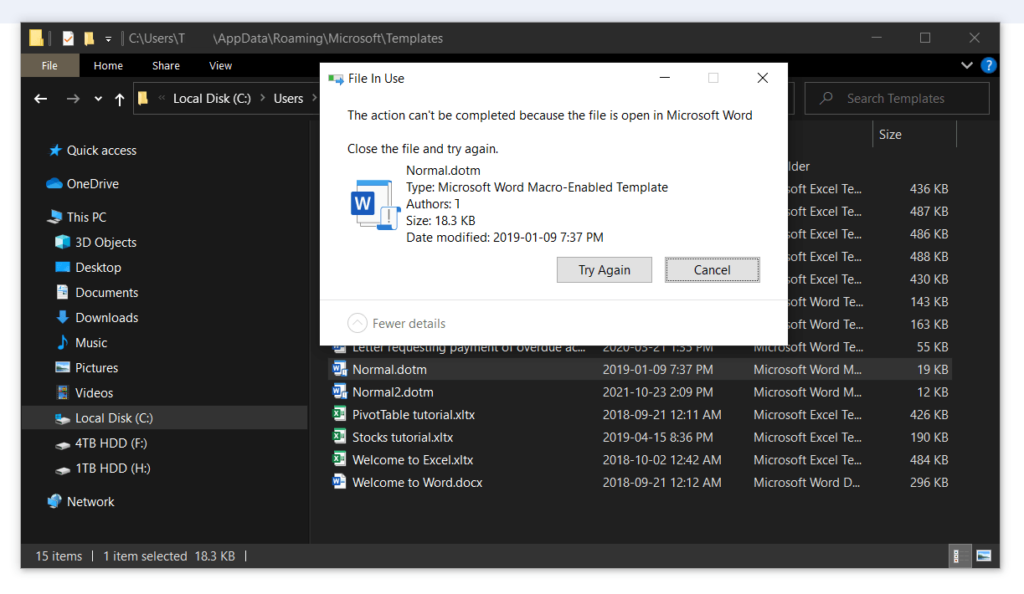
Delete the original Normal.dotm file. If it deletes successfully you can move onto Step 9. If you get the following error, stay with this step.
Even though I fully closed Word I get the following error when trying to delete the file:
“This action can’t be completed because the file is open in Microsoft Word”
:@ Anger. That file can’t be open in Word because Word isn’t even open!
Step 8 B.
Word is actually running in the background because Microsoft is annoying like that.
Open up the Windows Task Manger.
You can do this by typing “Task Manger” into the search bar on your Windows task bar.

Under the “Processes” tab of Task Manger if you scroll down, under Background Processes, eventually you will find Microsoft Word.
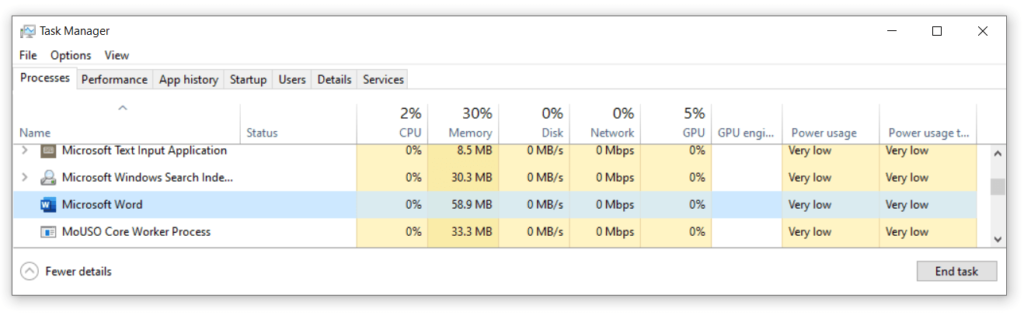
Click on it and then hit the “End task” button in the bottom right of Task Manager.
Okay now we can go back to the Templates folder and finally delete the file Normal.dotm
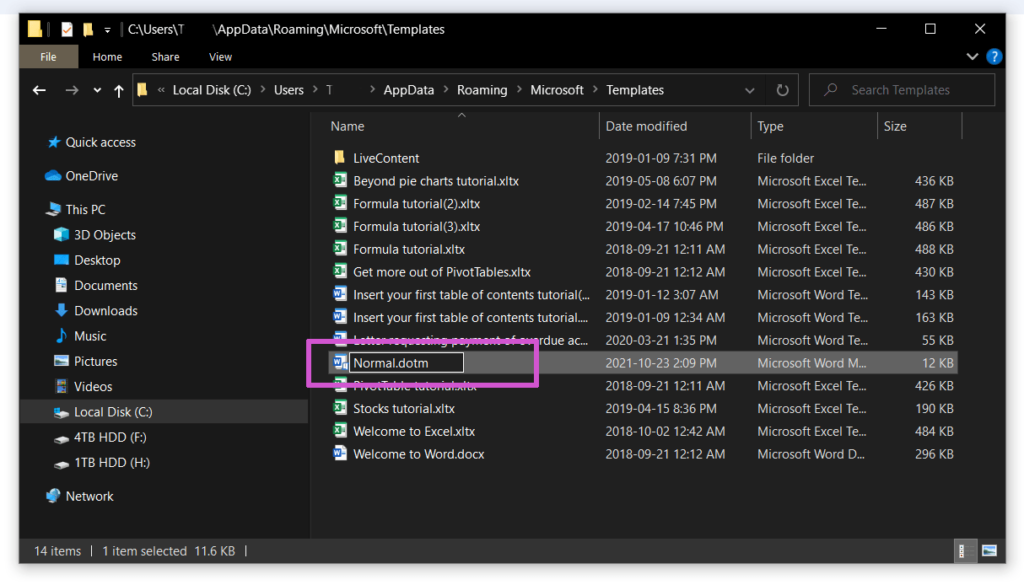
Now we’re just left with Normal2.dotm
Step 9:
Rename the Normal2.dotm file to just Normal.dotm
You can do this by right clicking the file and selecting Rename.
Step 10:
All Done! You can open Microsoft Word up again and check that it default opens with your new settings.
For me, I can see it opens with the ‘No Spacing’ style by default now.

So that’s how to update the default settings template for Microsoft Office Word so that it opens with your preferred layout every time! Fixed!
Happy days!
Enjoy.